
Even with the popularity of cloud services, USB drives are still widely used in our daily life. It goes without saying that USB drive is very useful for saving and sharing files, but not all file formats can be copied to USB drive to achieve the purpose of saving and sharing. For example, some users have copied Apple Music songs to a USB drive in order to enjoy them on car audio system, or other USB-enabled devices. However, as a streaming music service, all songs downloaded from Apple Music are encrypted files and cannot be recognized by other devices and software. In other words, it doesn't make sense to copy Apple Music songs directly to USB drive.
The correct way is to convert Apple Music songs to MP3/M4A first, then copy the output files to USB drive. This article shows you how to use TuneKeep Audio Converter to convert Apple Music songs to MP3/M4A and save them to USB drive.
Where Are My Downloaded Apple Music Songs on PC
By joining an Apple Music membership, you can download Apple Music songs to your computer, mobile phone and tablet for offline playback. On your computer, Apple Music songs downloaded to your iTunes Music Library or Music app is stored in a local folder. For iTunes on Windows or macOS up to macOS Mojave 10.14, you can click menu "Edit" > "Preferences" > "Advanced" tab to find the location of the "iTunes Media" folder. If you open this folder, you will see the Apple Music folder. Downloaded Apple Music songs can be found in their respective artist or album folders.
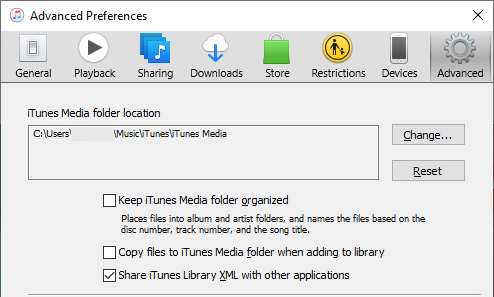
Open Apple Music folder on Windows, and you will be able to confirm that the extension of the downloaded Apple Music are M4P (* .m4p) files. If you copy Apple Music M4P songs to a USB drive, connect it to a device that can connect to a USB drive such as a car audio system, and you will find you won't be able to play the songs. M4P cannot be recognized at all. Because Apple Music M4P songs are encrypted with FairPlay, a DRM technology, and associated with the Apple ID you used to join Apple Music. In other words, there is nothing you can do about M4P files on devices that cannot authenticate your Apple ID. In other words, it doesn't make sense to copy Apple Music songs directly to a USB drive.
For macOS 10.15 Catalina or above, iTunes was changed into Music app. You can go to menu bar, click Music > Preferences > File tab to find the location of iTunes media folder.
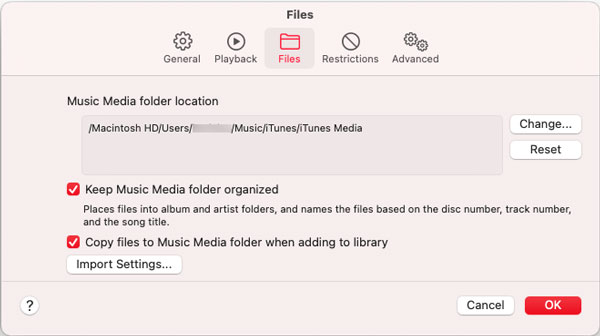
In the same way, you will find Apple Music folder. However, the file extension may be different depending on audio quality you choose on macOS. For Apple Music AAC audio, the file extension will be M4P (*.m4p) as it's on Windows. For Apple Music Loseless or Apple Music Hi-Fi Lossless, the file extension will be MOVPKG (*.movpkg).
Both M4P and MOVPKG files are encrypted Apple Music songs, so it's meaningless to copy the Apple Music songs to USB drive directly. If you want to save your favorite Apple Music songs in USB drive and use them in other device or software, TuneKeep Audio Converter will be your best helper.
TuneKeep Audio Converter: Save Apple Music Songs on USB Drive
TuneKeep Audio Converter can easily convert copy-protected Apple Music songs to plain and all-purpose MP3 or M4A files which you can copy to USB drive. After copying to USB drive, you can easily copy the songs between your computers as well as enjoy the songs on your car audio or other device.
TuneKeep Audio Converter Features List
- Convert Apple Music songs to plain MP3, M4A, FLAC, WAV, AIFF, AC3, AAC, etc.
- Convert 256kbps Apple Music songs to 320kbps MP3 or 256kbsp M4A losslessly
- Convert at 16X speed on Windows and macOS up to 10.12, convert at 1X speed for macOS 10.13 or above because of system limitation
- Keep song title, album, artist, genre, track number, artwork and other ID3 tags
- Use ID3 tags like title, album, artist, etc. and hyphen to rename output files in bulk
- Sort output files to folders by album, artist, artist/album, etc.
- Compatible with the latest versions of Windows, macOS, iTunes and Music app
How to Convert Apple Music Songs to MP3/M4A and Copy Them to USB Drive
Here, we will show you how to use TuneKeep Audio Converter to convert Apple Music songs to MP3, M4A which you can easily copy to USB drive. Please check the user guide below.
Step 1: Launch TuneKeep Audio Converter

Launch TuneKeep Audio Converter, iTunes or Music app (on macOS 10.15 Catalina or later) will also be launched. Music library will be also loaded automatically. Apple Music songs, Apple Music playlists, etc. are displayed in the left panel. Please do not close iTunes or Music app until the conversion is completed.
Step 2: Choose Apple Music Songs
Choose a playlist on the left panel first, and check the songs you want to copy to the USB drive. If you select the checkbox at the top, all songs in the playlist will be selected. You can also use the built-in search box to quickly find songs. After entering a keyword (song title, artist, album, etc.) and press Enter button, the search results will be displayed immediately.

Step 3: Select MP3/M4A Output Format
In the list of output formats, TuneKeep Audio Converter have prepared several output formats including MP3, M4A, WAV, AIFF, FLAC, AC3, etc. We recommend the versatile MP3/M4A which can avoid compatibility problems. If you select 320kbps MP3 or 256kbps M4A from the profile list, you can convert Apple Music AAC songs without loss of sound quality.
If necessary, you can click Options button to set the conversion speed, output file volume, how to rename or sort output files.

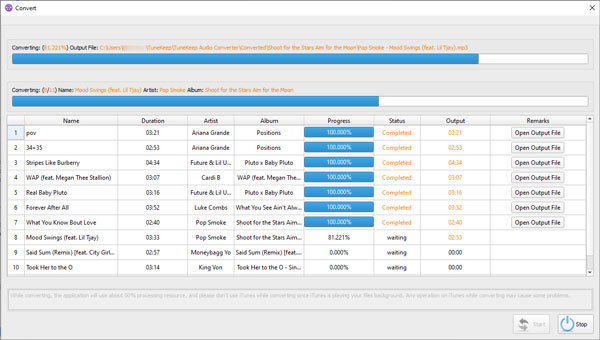
Step 4: Start Apple Music Conversion
Click the "Convert" button to start converting Apple Music songs to the selected format. After the conversion is complete, click the "Open Output File" button to open the output folder and locate the output files.
Step 5: Save Output Files to USB drive
Now you can insert the USB drive to USB port on Windows or macOS computer, then easily copy the converted Apple Music songs to the USB drive by copy & paste or drag & drop.
If you want to use the USB drive on both Windows and macOS, it is recommended to format the USB drive to exFAT format which comes with best compatibility on different devices. For some old OS, you can also format the USB drive to FAT32 which can be used on Windows and macOS. If you format the USB drive to NTFS format, you will not be able to copy the output MP3/M4A to the USB stick on macOS because macOS does not have permission to write to NTFS-formatted USB drive.
Now you can easily save and copy Apple Music songs to USB drive. And you can insert the USB drive to USB port on your car to play Apple Music songs while driving. Of course, it is now possible to transfer converted Apple Music songs to other devices through USB drive as well.
If you want to copy Apple Music songs to USB drive, please do not hesitate to download and try TuneKeep Audio Converter.