The free trial version of TuneKeep Spotify Music Converter for Mac only converts 3 minutes of each Spotify song, and only convert 3 songs at a time. You can purchase a license key to activate the full version and get free update as long as your license hasn't expired. We provide flexible license plans including 1-month license, 1-year license and lifetime license. In this page, we will show you how to activate the full version and how to use TuneKeep Spotify Music Converter on macOS.
Something you may need to know about V4.6.2 or later
From September 2022, we adopted the new way (built-in web player) to convert Spotify songs. Compared to the old way, there are several benefits you can enjoy as below.
- This can avoid compatibility or crashing problems caused by Spotify version update or Spotify problems.
- The conversion speed is now 20x faster. When using old way, conversion speed is limited to 1X because of Spotify limitation.
Notes 1: The built-in web player is a broswer based on Google Chrome like many other browsers, however, you can only access to your own Spotify library with the browser. And we will NEVER collect your personal information and it's also impossible for us to do that.
Note 2: The old way is not working any more because of Spotify V1.1.93 update on August 30, 2022. However, no further update of the old way will be provided. To continue using this product, please download and install the new installer.
Notes 3: Your registration status won't be changed. You don't need to register again after installing the new version.
Notes 4: When logging in built-in web player, using "Continue with Google", "Continue with Facebook" or "Continue with Apple" might not be acceptable due to security protection from Google, Facebook or Apple. You may need to log in the built-in web player with a standalone email account and its password.
How to unlock the full version of TuneKeep Spotify Music Converter (Mac)?
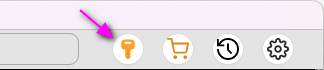
Launch TuneKeep Spotify Music Converter for Mac and you will see 4 button in the upper right corner of the software interface. Click the key icon to open Register dialog.
In Register dialog, copy the license key from your email box and paste it in the "registration code" blank box. Then click "Register" button to register full version.
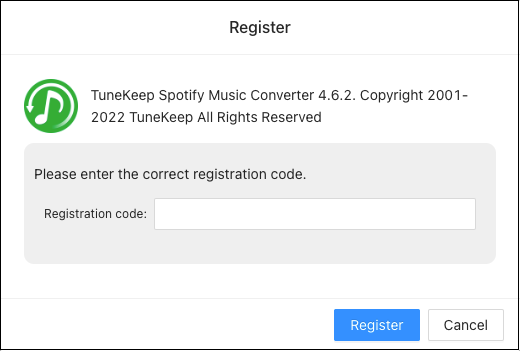
Note 1: The registration code is a long string of upper-case letters and numbers. It is case sensitive. Please do not add extra blank at the beginning or at the end of the code, and make sure what you copied is complete.
Note 2: Please make sure you have internet connection when registering the product. Please contact us if you didn't receive your registration code.
Two free ways to upgrade to latest version
Once you purchased our product, you can enjoy free upgrade as long as your license hasn't expired. And you don't need to register again after upgrading to latest version. There are two free ways to upgrade to latest version.
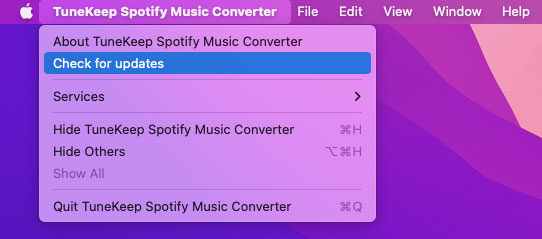
1. Click menu "TuneKeep Spotify Music Converter" > "Check for updates" and an update dialog will pop up. Download and install the latest version from the dialog.
2. Open our product page with a browser, click "Free Download" button to download the latest version, the button always links to latest version. Then simple double-click it to install and overwrite the old version.
Detailed user guide of TuneKeep Spotify Music Converter (Mac)
Although TuneKeep Spotify Music Converter for Mac is simple and easy-to-understand, some users may need some help to avoid some errors or problems when using the converter. Follow the steps below and it can help you to download and convert Spotify music songs to MP3, M4A, etc. and enjoy them on multiple devices more clearly and more efficiently. TuneKeep Spotify Music Converter for Mac can automatically skip audio advertisement when using Spotify Free, and help you break the limitations of Spotify Premium.
Step 1: Launch the Program and Log in
Launch TuneKeep Spotify Music Converter on Mac and a built-in Spotify web player will be launched as well. There will be a "Log in" button in the upper right corner of software interface with a hint message saying "Click here to login: Please click the button to log in your account". Click "Log in" button, enter your Spotify account and password to log in Spotify web player.
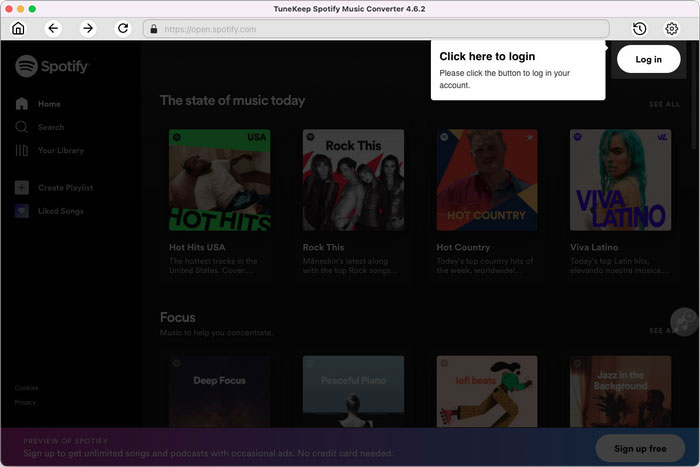
The message will be only displayed in the first launch or you have logged out your account. If you don't want to log in every time you launch the program, please also check "Remember me" option in the sign-in screen. Please note that using "Continue with Google", "Continue with Facebook" or "Continue with Apple" to log in built-in web player might not be acceptable due to security protection from Google, Facebook or Apple.
Step 2: Adjust Output Settings (Optional)
TuneKeep Spotify Music Converter for Mac provides MP3, AAC (M4A), WAV, FLAC and AIFF output formats and Auto option. By default, output format will be set to Auto option, which is actually 256kbps M4A. If you want to change output format, you can click "Settings" icon in the upper right corner of software interface and select the format you want.
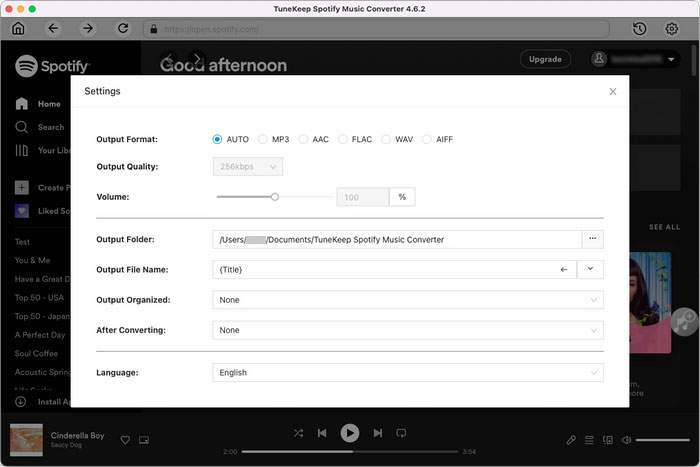
In Settings dialog, you can also adjust ouput volume, change output folder, rename output files in batch, sort output files into folders, choose an action after conversion, and choose software interface language. It's recommended to adjust the settings before conversion.
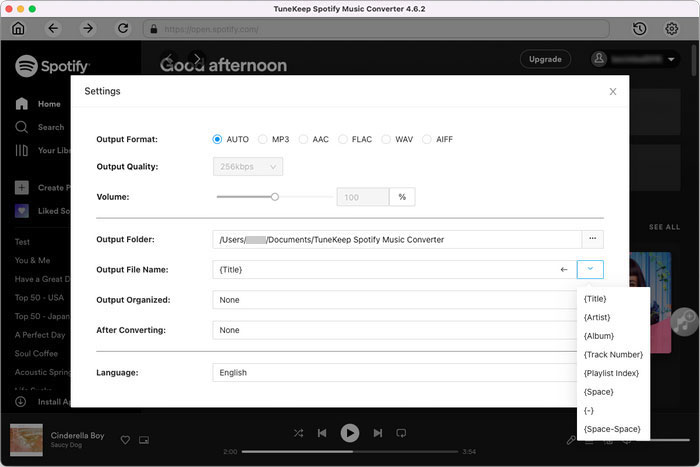
In "Output File Name" list, you can use the tags {Title}, {Album}, {Artist}, {Track Number}, {Playlist Index}, {Space}, {-} and {Space-Space}. By default, you will only use {Title}, however, you can rename the output files flexibly like "{Artist}{Space-Space}{Title}", "{Album}{Space-Space}{Title}", "{Album}{Space-Space}{Track Number}{Title}", etc. You can use the left arrow to delete the tags and edit the rule of output renaming again.
In "Output Organized" list, you can sort output files into Artist, Album, Artist/Album or Album/Artist folders or use "None" to put all the output files in the same folder. As to "After Conversion" list, you can choose "Open the output folder" or "Put the computer to sleep".
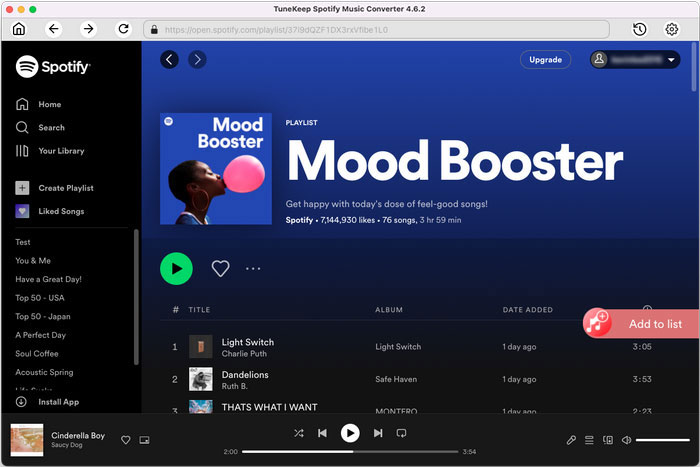
Step 3: Open an Album or a Playlist
Now you can browse your favorite playlists and albums in the built-in Spotify web player. You can click on the artwork of your favorite playlist or album to open the detailed page. If you open an artist page, there should be multiple albums and you need to click on the artwork of your favorite album to open the detailed album page.
Step 4: Add to Conversion List
In the detailed page of an album or a playlist, you will see a music button with plus symbol in the middle right. Move your mouse to the button and it will be changed to "Add to list" button. Click "Add to list" button to add all the songs in the playlist or in the album to conversion list.
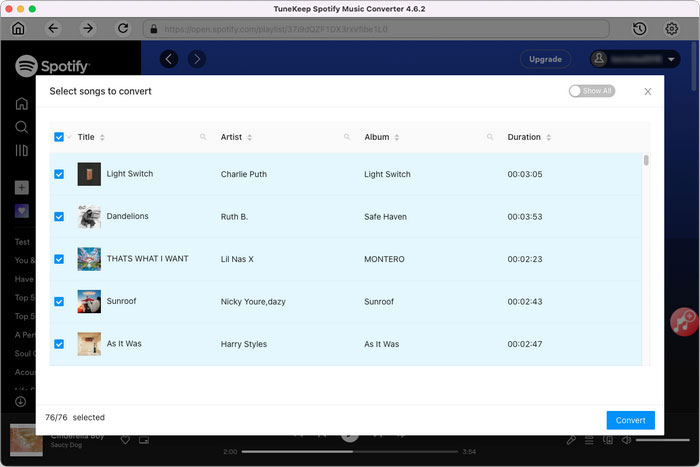
Step 5: Choose Songs
By default, all the songs in the playlist/album will be added in checked status. However, if necessary, you can uncheck the songs you don't want to convert. Music information like title, artist, album, duration and artwork thumbnail will be displayed as well. If the conversion list includes 100 or more songs, you can choose to display 10, 20, 50 or 100 songs per page. If you have converted a part of the album or the playlist and you want to hide the converted songs, you can click "Show All" button and switch to "Hide converted" button.
Step 6: Start Conversion
Now simply click the "Convert" button to start conversion. All the checked Spotify songs will be converted to MP3, M4A or specific output format at 20X faster speed. It only costs you 10 seconds to convert a 4-minute song.

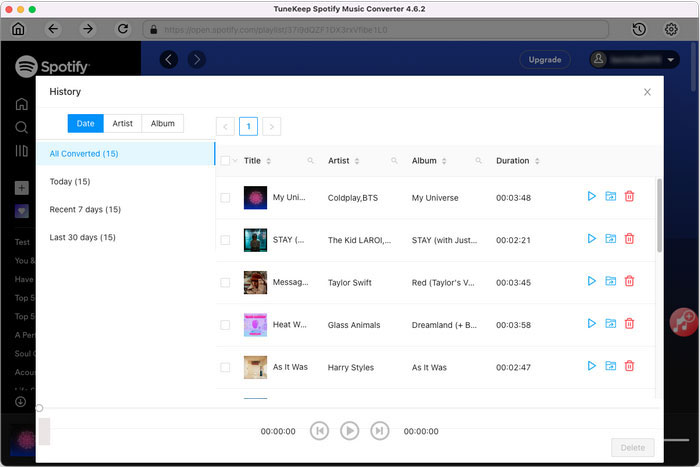
Step 7: Check Conversion History (Optional)
After conversion, you can simply click "History" icon in the upper right corner of software interface to check all the converted songs. The history output songs can be viewed by date, artist or album. If necessary, you can play the songs here and you can delete the history only without deleting the files, or delete both history and local files.