![]()
Cute Cut is a video editing application for Android, iOS and macOS. You can use videos, photos or self-draw, add text, music, voice, etc. to create lively slideshows and videos. Cute Cut provides free version with watermark and length limitation, as well as a paid version without limitations. With the free version, you are limited to creating videos within 30 seconds, and the Cute Cut watermark will appear in the lower right corner of the created video. You can remove the restrictions by purchasing the pro version. The professional version of Cute Cut Pro is available at $5.99.
Cute Cut can load MP3/M4A music files from Music app as background music, but if you load an Apple Music song, you will simply get "cannot open DRM protected music" error message. To add your favorite Apple Music songs to Cute Cut as Background music, you need to convert Apple Music songs to MP3, M4A on computer with TuneKeep Audio Converter first, then transfer them to your device.
The Steps of Editing A Video with Cute Cut App
With Cute Cut app, you can use existing videos and photos from your photo app as input, add your favorite music as background music, and create videos or slideshows with simple steps. Below are the general steps for the iPhone version of Cute Cut. Not all features are introduced here. If you want to know all the features of Cute Cut, please try it for yourself.
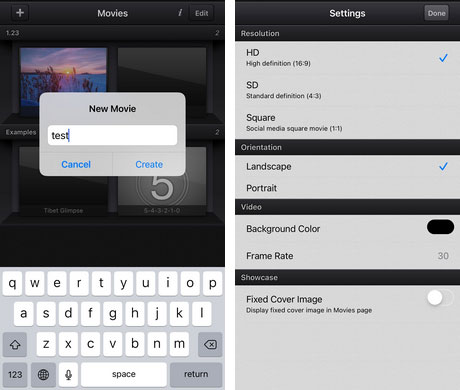
Step 1: Create A New Movie
Launch Cute Cut, tap the "+" button in the upper left, enter the name of the new movie, and tap the "Create" button to display the new project settings. You can set the resolution, orientation, video background and frame rate, showcase, etc. as needed. If you are new to Cute Cut, you can tap an example that Cute Cut has prepared for you to learn about its features before creating a new movie.
Step 2: Add Videos and Photos
You can add videos and photos by tapping the "+" button in the middle left of the movie editing screen. Then you can add videos and photos from the Photos app. You can press photos and videos to move around in the timeline. You can add text and display it on top of your photos and videos. For Self-draw, it is a unique feature of Cute Cut. If you are interested, please give it a try.

Double-tap a video and you will see some features buttons in the bottom. You can use the feature buttons to edit the video as you like.
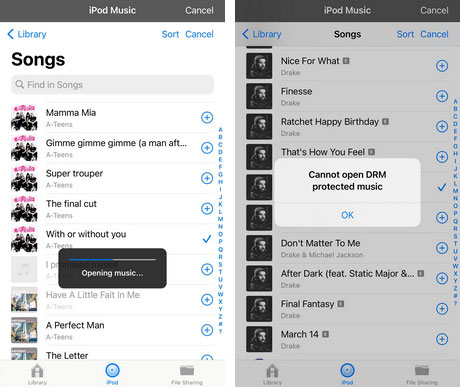
Step 3: Add Background Music
Tap "+" button, tap "Music" and you will see three tabs: "Library", "iPod" and "File Sharing". The library includes songs and sound effects built-in Cute Cut app. Tap "iPod" to show the library of Music app. Select a song and tap the + button to add the song to Cute Cut video editing project as background music. If the music you tapped is an MP3 or M4A file in the Music app, "Opening music" message will be displayed. However, when you tap an Apple Music song, you will get "Cannot open DRM protected music" error message. Now we know that we can't add Apple Music songs directly to Cute Cut because Apple Music songs are DRM protected.
After adding a song, you can double-tap it and there will be some features button for you to edit the song.
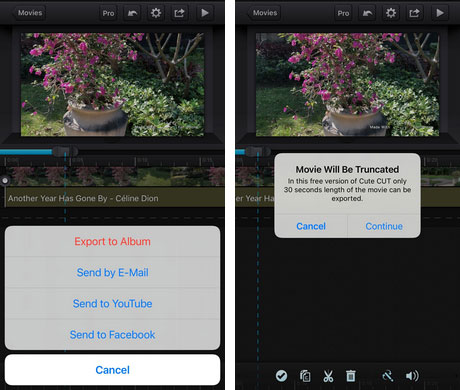
Step 4: Create or Send Video
When you're ready, click the share button in the upper right corner of Cute Cut and you will see options such as Export to Album, Send by Email, Send to YouTube and Send to Facebook. Choose the option you want. However, if you make a video which is longer than 30 seconds, the video will be truncated.
You can now use Cute Cut to create HD videos from videos, photos, music and post them on YouTube, Facebook and more. But what if you want to add your favorite Apple Music songs as Cute Cut background music? The answer is to use TuneKeep Audio Converter to convert Apple Music songs to MP3 or M4A first.
TuneKeep Audio Converter: The Solution to Use Apple Music in Cute Cut
TuneKeep Audio Converter can convert Apple Music songs in your library to MP3, M4A, WAV, AIFF, FLAC, etc. without loss in cooperation with iTunes or Music app. With TuneKeep Audio Converter, you can easily solve the problem that Cute Cut displays "cannot open DRM protected music" error message when trying to add Apple Music songs to Cute Cut.
TuneKeep Audio Converter Features List
- Convert Apple Music songs to MP3, M4A that can be added to Cute Cut as BGM
- Convert 256kbps Apple Music songs to 320kbps MP3 or 256kbps M4A without loss
- Keep song title, artist, album, genre, track number and artwork in output files
- Rename output files in bulk by song title, album, artist, track number, hyphen, space
- Organize output files into folders by album, artist, artist/album, album/artist, etc.
- Convert 16X faster on Windows & macOS 10.9.5 - 10.12.6, 1X on macOS 10.13 and later
- Convert Apple Music songs added to library without downloading them
- Compatible with latest versions of Windows, macOS, iTunes and Music app
Convert Apple Music Songs to MP3/M4A and Add to Cute Cut as Background Music
Follow the simple steps below to convert your favorite Apple Music songs to MP3, M4A with TuneKeep Audio Converter first, then transfer the output files to your device and use in Cute Cut as background music.
Step 1: Launch Apple Music Converter
When you launch TuneKeep Audio Converter, iTunes or Music app (Mac 10.15 Catalina or later) will also be launched automatically. Meanwhile, the playlist in the iTunes / Music app is also automatically loaded and displayed in the left panel. Do not operate or close iTunes or Music app before the Apple Music conversion is completed.
Step 2: Select Apple Music Songs
You can select a song by selecting the playlist on the left panel and checking the check box of the song in the playlist. You can select the entire playlist by ticking the top checkbox of the playlist. If necessary, you can search a song, artist or album quickly by using the built-in search box in the interface.

Step 3: Select MP3/M4A Format for Cute Cut
TuneKeep Audio Converter has prepared output formats such as MP3, M4A, WAV, AIFF, FLAC, AAC, AU. Among them, the formats that can be Cute Cut are MP3, M4A and WAV. The default output format is MP3. You can change from the list of output formats to M4A and WAV. In the profile list, you can select the audio quality of the output format.

If necessary, you can click Options to specify Apple Music conversion speed (Windows version only), output file volume, renaming method, how to organize into folders, and more.
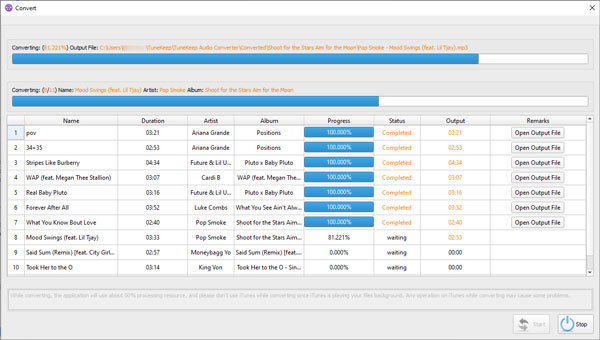
Step 4: Start Apple Music Conversion
When you're ready, click the "Convert" button to start converting Apple Music songs to the specified format. After the conversion is complete, click the "Open Output File" button to display the output folder and find the output MP3/M4A/WAV audio files.
Step 5: Transfer Output Files to Your Device
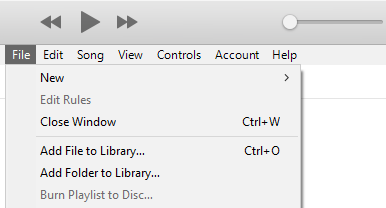
If you are using iPhone/iPad, launch iTunes or Music app, add the output files to the library, and transfer them to the iPhone connected to your computer. For iTunes, you can add the output music in the output destination to the library by clicking "File" & "Add File to Library" in the menu. For the Music app, you need to click "File" > "Import" in the menu.
If you are using Android device, connect the device and your computer with the USB cable, choose "File Transfer" and copy the output files to Android music folder.
After transferring, the converted Apple Music songs can be added to Cute Cut without any problem.
Now you can easily create videos and slideshows with Cute Cut and add your favorite Apple Music songs as background music. If you are using both Cute Cut and Apple Music, please do not hesitate to download and try TuneKeep Audio Converter.