![]()
iMovie is a free and easy-to-use Mac video editing application developed by Apple. With iMovie, you can use videos, photos and music to create SD/HD MP4 videos. At first, it was only available for Mac and from 2012, iMovie was also available for iPhone and iPad. As a part of Apple ecosystem, iMovie is not available for Windows or Android.
iMovie comes with plenty of built-in titles, backgrounds and transition effects which you can use in your iMovie video projects. As to background music, you can import songs from iTunes or Music app, use built-in sound effects or use audio creations from GarageBand. However, Apple Music songs in the library can't be added as background music for iMovie video editing projects because Apple Music is a streaming music service and the downloaded Apple Music songs are encrypted M4P files.
In this article, we will introduce how to use TuneKeep Audio Converter to convert Apple Music songs to MP3 or M4A and use the output files as the background music of your video editing projects of iMovie on Mac, iPhone or iPad.
Apple Music M4P Songs Can't Be Added to iMovie as Background Music
Creating a video with iMovie is just as easy as a breeze on Mac. Launch iMovie and create a new video project, then you can easily find "My Media", "Audio", "Titles", "Backgrounds" and "transitions". Click "My Media" to import your favorite videos and photos as materials of your video editing project, and you will see "drag and drop video clips and photos from browsers above to start creating your movie" in the bottom left. Just follow the tip to add some videos and/or photos.
Now click "Audio" and you will find "Music", "Sound Effects" and "GarageBand" in the left panel. Here "Music" is the Music app in macOS Catalina 10.15 or later and if you click "Music", your songs in the music library will be displayed. However, if you are an Apple Music subscriber and have downloaded some songs to Music app, you won't be able to find any downloaded Apple Music songs in the list except for the message "xxx files are unplayable and unavailable".
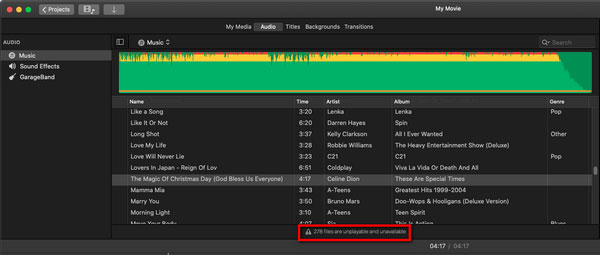
The error message simply tells the truth that downloaded Apple Music songs won't be displayed in iMovie and you can't use your favorite Apple Music songs as background music for your iMovie video editing project.
The songs in M4A format you purchased from iTunes Store, or MP3, M4A, WAV or AIFF songs from other sources you added to Music app will be available in iMovie. As the rising of Apple Music, more and more songs are only available in Apple Music and unavailable in iTunes Store, that is to say, even if you have subscribed Apple Music and are also willing to purchase the songs separately, there is nowhere you can buy them from.
Background music always takes an important role in a video. What to do if the songs are only available in Apple Music? The solution is to convert the Apple Music songs to MP3, M4A, WAV or AIFF which can be accepted by iMovie. And TuneKeep Audio Converter is the perfect solution for adding Apple Music to iMovie.
TuneKeep Audio Converter: The Best Helper for Adding Apple Music to iMovie
TuneKeep Audio Converter can easily convert any Apple Music songs in your iTunes or Music app to all-purpose MP3, M4A, WAV, AIFF, etc. with ID3 tags completely retained. If you intend to create videos with iMovie and use Apple Music songs as background music, TuneKeep Audio Converter is absolutely the best helper.
Features & Advantages of TuneKeep Audio Converter
- Convert encrypted Apple Music songs to MP3, M4A, WAV or AIFF for iMovie
- ID3 tags like song title, album, artist, artwork, genre, etc. will be kept
- Lossless convert 256kbps Apple Music to 320kbps MP3 or 256kbps M4A
- 16X faster speed on Windows or Mac 10.9 - 10.12 (Only 1X on Mac 10.13 or later)
- Rename and sort output files by ID3 tags or characters like hyphen, slash & space
- Convert Apple Music songs online directly without downloading to computer
- Fully compatible with latest Windows, Mac OS, iTunes or Music app
Convert Apple Music to MP3 or M4A and Use as BGM in iMovie
TuneKeep Audio Converter is extremely easy-to-use and can convert Apple Music songs to MP3, M4A, WAV, etc. in only a few clicks. It needs to work with iTunes or Music app. Check the steps below for your reference.
Step 1: Launch TuneKeep Audio Converter
Launch TuneKeep Audio Converter and iTunes or Music app (on macOS Catalina 10.15 or later) will be also launched automatically. Please keep iTunes or Music app in background and do not operate or close it before the conversion is done.
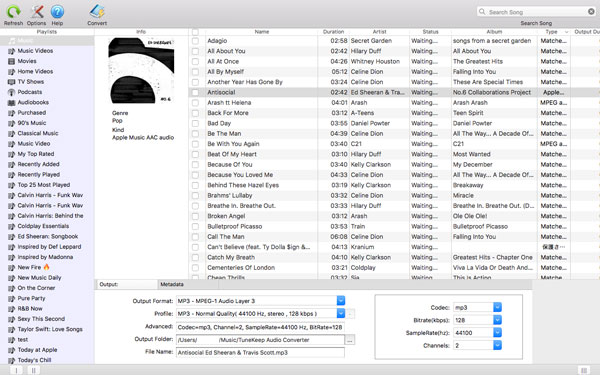
Step 2: Choose Apple Music Songs
Songs, Apple Music playlists and your personal playlists will be listed in left panel. Click a playlist and tick the checkboxes to choose the songs. Or you can tick the top checkbox to choose all songs of the playlist. If necessary, you can search a keyword like title, album or artist in the search box and the results will be displayed quickly.
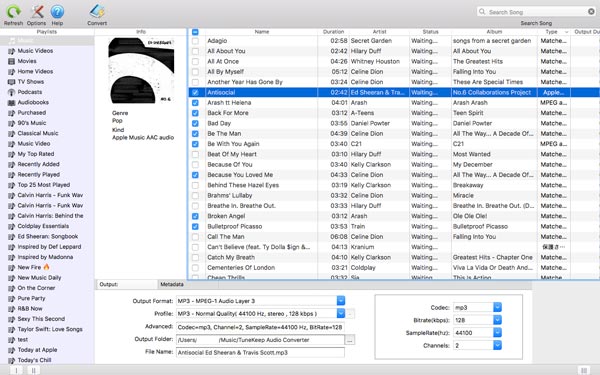
Step 3: Output Settings
In the bottom panel, you can choose an output format from Output Format list and choose your favorite quality in Profile list. MP3 is the default output format which can be used in Movie, and if necessary you can also choose M4A, WAV or AIFF because the formats are also compatible with iMovie. As Apple Music songs are protected 256kbps AAC files, if you want lossless conversion, choose 320kbps MP3 or 256kbps M4A. Click Options button to set a rule if you want rename and sort output files.
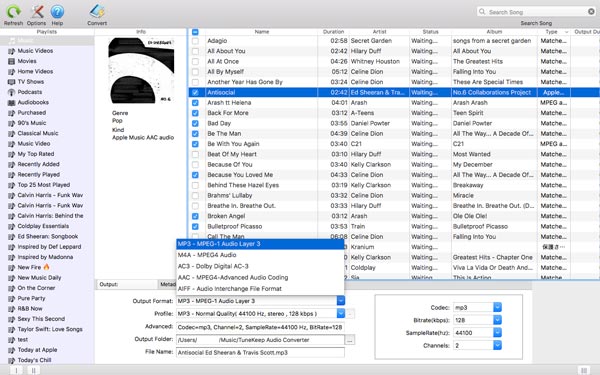
Step 4: Start Apple Music Conversion
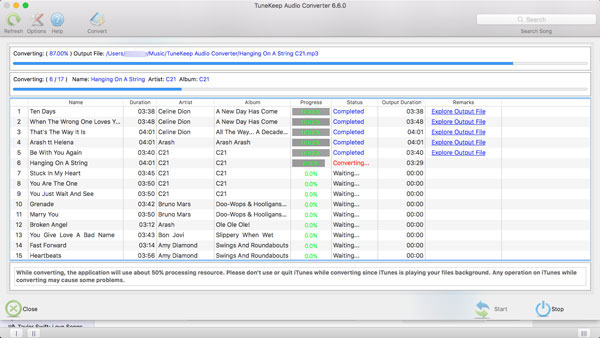
Now you can simply click the "Convert" button to start Apple Music conversion. The conversion speed could be 16X faster on Windows or Mac 10.9 - 10.12, however, because system limitation, the conversion speed on macOS High Sierra 10.13 or later will be only 1X. If any Apple Music songs have been converted, you can click "Explore Output Files" button to open the output folder and locate the output files.
Step 5: Add Converted Apple Music Songs to Music App
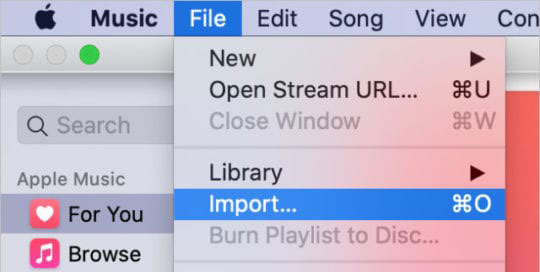
Now, launch Music app and click menu "File" & "Import" and browse the output folder of TuneKeep Audio Converter to add the output songs to Music library. Of course, a folder can be also imported. If you are using macOS Mojave 10.14 or older Mac, launch iTunes and click menu "File" & "Add File to Library" to add the output songs.
Step 6: Create Videos with iMovie & Your Favorite Apple Music Songs
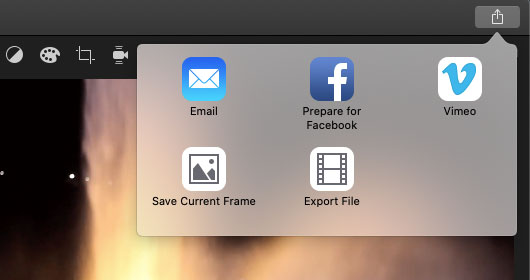
After adding the songs to Music app, you will be able to find it in "Music" of "Audio" tab in iMovie. Simply drag your well-converted Apple Music song to audio track section in the bottom panel of iMovie. After that, add your favorite titles, backgrounds and transitions. When you are satisfied with your video editing project in iMovie, click the up arrow button in the upper right to decide how to publish or save the video. Click "Export File" if you want to save the project as MP4 video on your Mac.
Now, we have successfully create vivid videos with iMovie and your favorite Apple Music songs. If you are using iMovie app on iPhone or iPad, you will encounter same problem that you can add downloaded Apple Music songs in your library to iMovie as BGM, the solution is TuneKeep Audio Converter as well. Just connect your iPhone or iPad to your Mac and transfer the songs to your device via Music app.
There are millions of users who are using both Apple Music and iMovie, and how to add Apple Music to iMovie becomes a thorny problem for many users. With TuneKeep Audio Converter, the problem can be resolved in an incredibly easy way. If you also have the same problem, do not hesitate to try TuneKeep Audio Converter.